Streamlining and Automating Jenkins Server Provisioning with Infrastructure as Code
In this blog, we’ll explore how to create a Jenkins server on an EC2 instance with an EBS volume using AWS CloudFormation.
Jenkins is a popular open-source automation server that enables developers to build, test, and deploy software projects seamlessly.
AWS CloudFormation is an infrastructure-as-code service that simplifies provisioning and managing AWS resources.
Reason
I have been working with various POC(Proof-Of-Concept)s for application deployments using docker, Kubernetes and AWS services. Deploying a Jenkins server manually can be time-consuming and error-prone, especially when dealing with multiple environments or teams.
By using CloudFormation, we can automate (on some level) the provisioning process, ensuring consistent and repeatable deployments. Additionally, CloudFormation allows us to version our infrastructure, making it easier to manage and track changes over time.
Prerequisites
- AWS account with the necessary permissions to create and manage resources.
- Basic understanding of AWS services, such as EC2, CloudFormation, and IAM.
- Familiarity with YAML or JSON syntax for writing CloudFormation templates.
Writing the CloudFormation Template
The CloudFormation template (jenkins.yaml) consists of several sections that define the resources required for creating a Jenkins server. Here’s a breakdown of the template:
- Parameters: This section defines input parameters that can be customized during the deployment process. In our case, we have parameters for the EC2 instance type, EBS volume size, AMI ID, and a tag prefix.
- Resources: This section describes the AWS resources to be created, including:
NewKeyPair: An EC2 key pair for secure SSH access to the Jenkins instance.JenkinsServerSecurityGroup: A security group that allows inbound traffic on ports 8080 (Jenkins UI), 22 (SSH), 80 (HTTP), and 443 (HTTPS).JenkinsInstance: The EC2 instance that will host the Jenkins server. It specifies the AMI ID, instance type, key pair, security group, and user data script for installing Jenkins and Java.
3. UserData: This section contains a bash script that performs the following tasks:
- Adds the Jenkins repository to the system’s package manager.
- Imports the Jenkins GPG key for package verification.
- Installs Java 11 and the Jenkins package.
- Enables and starts the Jenkins service.
4. Outputs: This section defines the output values that will be displayed after the stack creation is complete. In our case, it provides the Jenkins URL, which can be used to access the Jenkins UI.
Outputs:
  JenkinsURL:
    Description: Jenkins URL
    Value: !Sub http://${JenkinsInstance.PublicDnsName}:8080
Deploying the CloudFormation Stack
To deploy the Jenkins server using the provided CloudFormation template, follow these steps:
- Navigate to the AWS CloudFormation console.
- Click on “Create stack” and select “With new resources (standard).”
- Upload the
jenkins.yamltemplate or provide the template URL. - Specify the desired parameter values for the stack, such as the instance type, EBS volume size, AMI ID, and tag prefix.
- Review and optionally customize the remaining stack options.
- Acknowledge the creation of IAM resources, if applicable.
- Click “Create stack” to initiate the deployment process.

Pem Key Retrieval
When you create a new key pair using AWS CloudFormation, the private key is saved to the AWS Systems Manager Parameter Store. The parameter name has the following format:
/ec2/keypair/key_pair_idThe provided template will create a PEM key. To retrieve it from the AWS Parameter Store, first, we will need to get the ID of the key.
Use following command to get the ID.
aws ec2 describe-key-pairs --filters Name=key-name,Values=KEY_PAIR_NAME --query KeyPairs[*].KeyPairId --output text
Following is an example output:

Now the get-parameter command as follows to get the parameter for your key and save the key material in a .pem file.
aws ssm get-parameter --name /ec2/keypair/key-05abb699beEXAMPLE --with-decryption --query Parameter.Value --output text > new-key-pair.pem
Configuring Jenkins
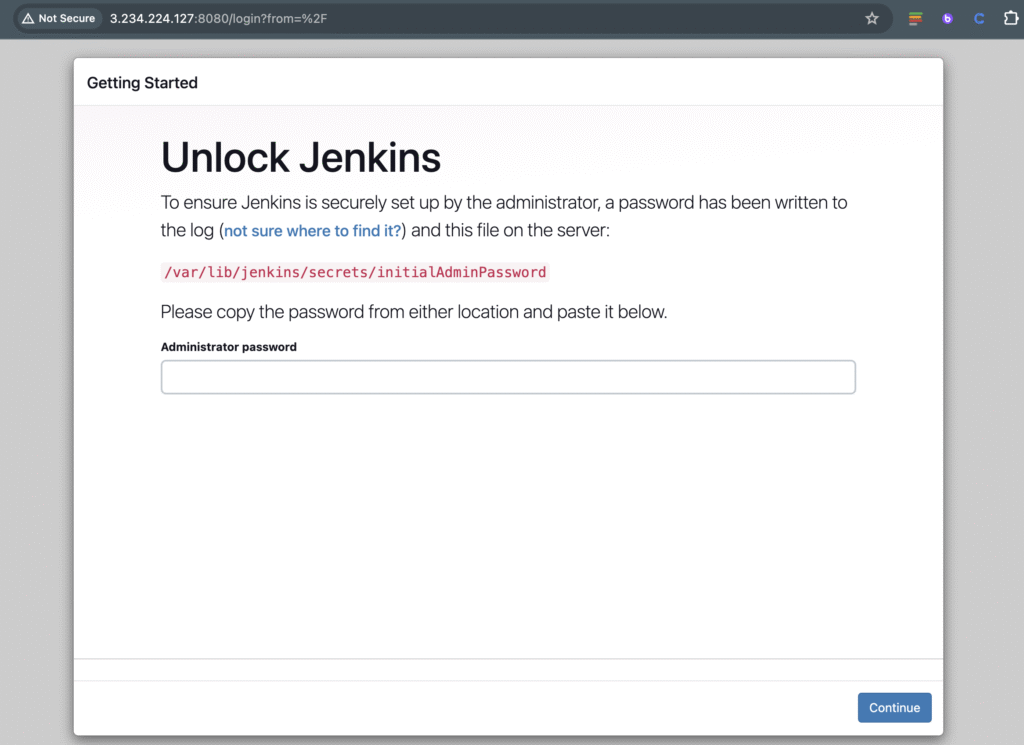
Once the CloudFormation stack is successfully deployed, you can access the Jenkins UI using the provided Jenkins URL output. Follow these steps to complete the initial configuration:
- Open the Jenkins URL in a web browser.
- Follow the instructions to unlock Jenkins by providing the initial admin password, which can be retrieved from the EC2 instance logs or the
/var/lib/jenkins/secrets/initialAdminPasswordfile. - Customize Jenkins by installing desired plugins and configuring the instance URL and other settings.
- Create an admin user for secure access to the Jenkins instance.
Testing the Jenkins Setup
To verify that the Jenkins server is running correctly, you can perform the following tests:
Create a sample “Hello World” job or pipeline to ensure that Jenkins can execute tasks successfully.
Maintenance and Best Practices
While the provided CloudFormation template sets up a basic Jenkins server, please consider the following best practices for maintaining and optimizing the setup:
- Security: Implement additional security measures, such as restricting access to the Jenkins UI, enabling HTTPS, and configuring authentication and authorization mechanisms.
- Backup and Recovery: Set up regular backups of the Jenkins home directory and configuration files to ensure data recovery in case of failures or disasters.
- Monitoring and Logging: Configure monitoring and logging solutions to track the performance and health of the Jenkins instance, as well as troubleshoot issues effectively.
- Scaling and High Availability: Consider scaling the Jenkins setup horizontally by adding more instances behind a load balancer or implementing high availability using techniques like clustering or AWS-managed services like Amazon EKS.
- Cost Optimization: Regularly review and optimize the EC2 instance type and EBS volume size based on your workload requirements to control costs.
NOTE:
- It’s important to note that this setup is intended for trial or testing purpose.
- Dependencies, such as AMI IDs or software versions, may change over time.
- Before deploying this CloudFormation stack in a production environment, ensure to verify and update the code, dependencies, and AMI IDs accordingly.
Conclusion
In this blog, we explored how to create a Jenkins server on an EC2 instance with an EBS volume using AWS CloudFormation. By leveraging CloudFormation, we can automate the provisioning process, ensuring consistent and repeatable deployments.
Additionally, we covered the steps to configure and test the Jenkins setup, best practices for maintaining and optimizing the environment, and pem key recovery from the AWS Parameter Store.
Remember, this guide provides a starting point for deploying a Jenkins server on AWS. As your requirements evolve, you may need to adapt and customize the setup to meet your specific needs, such as implementing additional security measures, scaling horizontally, or integrating with other AWS services.