
Managing secure data sharing between AWS accounts is essential for modern cloud operations. A common scenario involves allowing an application in one AWS account to interact with an S3 bucket in another account. This guide explains why cross-account access is needed, provides a detailed example of setting it up (with an encrypted S3 bucket), highlights key considerations, and offers AWS CLI commands to test your setup.
Why Cross-Account Access?
Cross-account access solves several challenges in multi-account AWS environments:
- Security Isolation: Keeps resources isolated while enabling controlled sharing.
- Centralized Data Storage: Reduces duplication by storing shared resources in a single location.
- Cost Optimization: Avoids replicating data unnecessarily across accounts.
- Scalable Collaboration: Facilitates collaboration between teams or services in different AWS accounts.
For instance, a shared S3 bucket in a central account can collect logs, backups, or artifacts from various applications hosted in different AWS accounts.
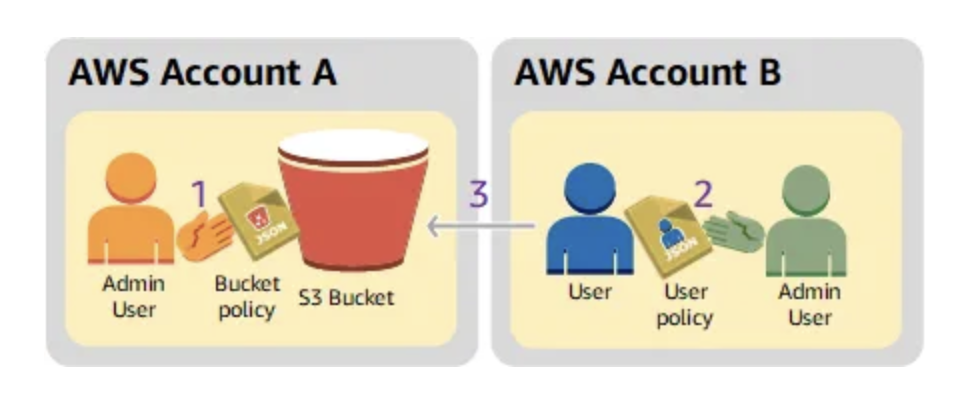
How Does Cross-Account Access Work?
The setup involves:
- IAM Role in the Source Account (Account A): This role grants the application permissions to access the target S3 bucket.
- The S3 Bucket Policy in the Target Account (Account B) specifies which roles in Account A can access the bucket.
- KMS Key Policy (if encryption is enabled): This policy allows the application in Account A to use the KMS key to encrypt and decrypt data.
Scenario: Uploading Data Across Accounts
Imagine an application running in Account A (Source) that uploads log files to an encrypted S3 bucket in Account B (Target). You need to configure cross-account access to achieve this securely.
Step-by-Step Example
Step 1: Create an IAM Role in Account A
- Go to the IAM Console in Account A.
- Create a role and choose Another AWS Account as the trusted entity. Enter the Account B ID.
- Attach the following inline policy to grant
s3:PutObjectpermissions on the target S3 bucket:
{
  "Version": "2012-10-17",
  "Statement": [
    {
      "Effect": "Allow",
      "Action": "s3:PutObject",
      "Resource": "arn:aws:s3:::tenant-s3-test-bucket/*"
    }
  ]
}
4. Name the role (e.g., CrossAccountS3Uploader) and attach it to your application (e.g., an EC2 instance or Lambda function).
Step 2: Add a Bucket Policy to the S3 Bucket in Account B
- Go to the S3 Console in Account B and open the Permissions tab for the bucket.
- Add the following bucket policy:
{
  "Version": "2012-10-17",
  "Statement": [
    {
      "Effect": "Allow",
      "Principal": {
        "AWS": "arn:aws:iam::ACCOUNT_A_ID:role/CrossAccountS3Uploader"
      },
      "Action": "s3:PutObject",
      "Resource": "arn:aws:s3:::tenant-s3-test-bucket/*"
    }
  ]
}
Step 3: Update the KMS Key Policy (Optional)
If the bucket is encrypted with a KMS key, follow these steps:
- Go to the KMS Console in Account B.
- Edit the key policy for the KMS key associated with the bucket. Add this statement:
{
  "Version": "2012-10-17",
  "Statement": [
    {
      "Effect": "Allow",
      "Principal": {
        "AWS": "arn:aws:iam::ACCOUNT_A_ID:role/CrossAccountS3Uploader"
      },
      "Action": [
        "kms:Encrypt",
        "kms:Decrypt",
        "kms:GenerateDataKey"
      ],
      "Resource": "*"
    }
  ]
}
3. Save the updated policy.
Step 4: Test the Setup
Assume the IAM Role in Account A
Run this command to assume the role:
aws sts assume-role \
    --role-arn "arn:aws:iam::ACCOUNT_A_ID:role/CrossAccountS3Uploader" \
    --role-session-name "TestSession"
Save the temporary credentials from the output (AccessKeyId, SecretAccessKey, SessionToken).
Configure Temporary Credentials
export AWS_ACCESS_KEY_ID=<AccessKeyId>
export AWS_SECRET_ACCESS_KEY=<SecretAccessKey>
export AWS_SESSION_TOKEN=<SessionToken>
Upload a File to the S3 Bucket
echo "Cross-account access test" > testfile.txt
aws s3 cp testfile.txt s3://tenant-s3-test-bucket/testfile.txt
Verify the Upload
- Go to the S3 Console in Account B and verify the file exists in the bucket.
- Check the CloudTrail logs to ensure access was made using the IAM role from Account A.
Key Points to Consider
- Least Privilege Principle: Always grant the minimum required permissions to roles and policies.
- Validate Policies: Use the AWS Policy Simulator to verify IAM and S3 bucket policies.
- Network Configuration: Ensure the source application can reach the S3 bucket (e.g., via VPC endpoints or NAT).
- Encryption with KMS: If you are using KMS encryption, both the bucket and key policies must allow access.
- Temporary Credentials: Use temporary credentials for added security when assuming roles.
- Cross-Region Considerations: Ensure your CLI commands and roles specify the correct regions for the bucket.
- Monitoring: Enable CloudTrail and S3 access logs to audit activity and debug permission issues.
AWS CLI Commands to Test Setup
Assume Role
aws sts assume-role \
    --role-arn "arn:aws:iam::ACCOUNT_A_ID:role/CrossAccountS3Uploader" \
    --role-session-name "TestSession"
Upload File to S3
aws s3 cp testfile.txt s3://tenant-s3-test-bucket/testfile.txtList Objects in Bucket (Account B)
To verify the uploaded file:
aws s3 ls s3://tenant-s3-test-bucket/
Validate KMS Key Access (Optional)
aws kms decrypt \
    --ciphertext-blob fileb://testfile.txt \
    --key-id "arn:aws:kms:REGION:ACCOUNT_B_ID:key/KEY_ID"
References
Conclusion
Setting up cross-account access to an encrypted S3 bucket is a fundamental skill for DevOps engineers. Following the steps above, you can securely enable resource sharing between accounts while maintaining a strong security posture. Testing your setup using AWS CLI commands ensures a smooth and reliable configuration.
Key Takeaways:
- Security First: Always adhere to the least privilege principle.
- Monitor Regularly: Use CloudTrail and logs to keep track of access patterns.
- Practice Makes Perfect: Test the setup thoroughly to ensure all policies and permissions are correctly configured.
Cross-account access is a powerful feature when used responsibly, enabling collaboration and cost optimization across AWS accounts.